• PEMROGRAMAN WEB DINAMIS

    Pengertian web dinamis adalah suatu web yang konten atau isinya dapat berubah-ubah setiap saat. Sebab dalam teknologi pembuatan web dinamis sudah dirancang semudah mungkin bagi pemakai atau user yang menggunakan web tersebut..

  • SIMULASI DAN KOMUNIKASI DIGITAL

    Suatu proses peniruan dalam bentuk visual yang dideskripsikan menyerupai kata, gambar dan grafis..

  • SISTEM KOMPUTER

    Sistem komputer adalah suatu jaringan elektronik yang terdiri dari perangkat lunak dan perangkat keras yang melakukan tugas tertentu (menerima input, memproses input, menyimpan perintah-perintah, dan menyediakan output dalam bentuk informasi). Selain itu dapat pula diartikan sebagai elemen-elemen yang terkait untuk menjalankan suatu aktivitas dengan menggunakan komputer..

  • DASAR DESAIN GRAPIS

    Banyak yang berpikiran kalau desain yang baik adalah yang membutuhkan jam kerja yang banyak, membutuhkan skill tinggi dan aplikasi yang mahal. Ya, memang, tapi sebenarnya desain yang baik adalah desain yang sederhana, yang membuat setiap orang yang melihatnya mudah menangkap maksud dari sebuah bentuk visual tersebut..

  • BASIS DATA

    Pangkalan data atau basis data (bahasa Inggris: database) adalah kumpulan informasi yang disimpan di dalam komputer secara sistematik sehingga dapat diperiksa menggunakan suatu program komputer untuk memperoleh informasi dari basis data tersebut. Perangkat lunak yang digunakan untuk mengelola dan memanggil kueri (query) basis data disebut sistem manajemen basis data (database management system, DBMS). Sistem basis data dipelajari dalam ilmu informasi.

🚀 Info Kece UKK 2025 untuk Kelas 12 RPL 1 & 2!

🚀 Info Kece UKK 2025 untuk Kelas 12 RPL 1 & 2!


Halo RPL Squad! 🔥
UKK 2025 sudah di depan mata, saatnya kita siap tempur 💪
Biar makin semangat, yuk kenalan dulu sama pembimbing UKK kalian dan simak tips-tips sukses UKK ala Gen Z!


👨‍🏫 Pembagian Pembimbing UKK

📌 Pak Darsu membimbing:

Muhammad Rizky Prawiro, Mohammad Abhie Ramdani, Kaka Ramadhani Suherman, Alya Ramadhani Nur Aini, Fika Risciani, Haikal Zaki Firmansyah, Kesya Arifatun Safanah, Sela Salafiah, Dimas Hermawan, Aldi Alfan Febrian, Alpi Purnama, Zidan Septiana, Jimi Ahmad F., Nadhif Dzaki Abdillah, Adelio Farrell, Hafidz Amar Alfarizzie, Ayu Hartini, Gian, Ragil Faiq, Muhammad Rasya A., Fikka Apriliandini, Muhammad Ridwan, Wisnu Wardana, Rivaldy Fauzan.

📌 Pak Pribadi membimbing:

Farhan Fauzan, Akmal Ghani Laoda, Keisya Shaori, Ergin Kustiana, Robi Permana, Andika Ramdani, Rega Nur Sidiq, Panca Ferdian, Muhamad Aria, Afrizal Zahran, Farid Al-Munawwar, Sandi Arizki, Delia Sekar, Daffa Arief, Dede Supriatna, Aria Rizky, Didan Ramdhani, Galuh Agung, Zildan Abror, Rizky Fauzi, Kenz Felix, Fatan Apriyana, Radika Rayaga, Hariesta Fernando.

📌 Pak Beni membimbing:

Fahrul Riadu, Naufal Nurul, Yoana Tri, Akbar Al Fadillah, Athallah Wafi, Jihad Irfansyah, Ade Pebriana, Revan Septiansyah, Muhamad Fauzan, Sendi Febriansyah, Zullul Ardan, Reval Fadilah, Akbar Maulana, Nizar Firmansyah, Intan Dwi Sabila, Muhammad Gifar, Vicky Fachrizal, Andika Jaya, Irsyal Fathul, Angel Fransisca, Nabil Septi, Aldi Renaldi, Afrizal Herlambang, Mochammad Rifqi Tsani.


🌟 Tips Sukses UKK Ala Gen Z

Teamwork vibes only – belajar bareng, saling support
Ngulik Project – bikin mini project biar makin jago
Time management – bikin to-do list dan atur waktu
Cari inspirasi – eksplor ide dari GitHub, Dribbble, Behance
Stay chill – tetap jaga kesehatan & mental


🎉 Challenge Seru

📸 Selfie Bareng Pembimbing + caption motivasi → upload di grup kelas!
👥 Mini Kolab – bentuk kelompok belajar UKK versi kamu
🏆 Coding Sprint – siapa paling cepat solve bug, traktir teman es krim 🍦


💬 Ayo share semangatmu di grup WA / Discord kelas!
UKK itu bukan cuma ujian, tapi momen kita nunjukin skill dan kerja sama tim. 💻🚀


Salam Redaksi.

Share:

📊 Belajar Logika Excel Lewat Studi Kasus Target Penjualan


📊 Belajar Logika Excel Lewat Studi Kasus Target Penjualan


Banyak siswa menganggap pelajaran Informatika, khususnya Microsoft Excel, hanya sebatas mengetik angka dan membuat tabel. Padahal, Excel bisa menjadi alat yang sangat berguna untuk menganalisis data dan membuat keputusan cerdas.

Salah satu rumus yang menarik untuk dipelajari adalah IF, yang digunakan untuk membuat keputusan otomatis berdasarkan kondisi tertentu. Yuk, kita lihat contoh nyata!


🎯 Studi Kasus: Mengecek Target Penjualan

Bayangkan kita punya data penjualan sederhana:

NoBarangHargaTerjual (Jml)Target (Jml)Status
1Meja Tulis250.0001010LULUS TARGET
2Kursi150.0002021TIDAK LULUS
3Buku5.5001011TIDAK LULUS
4Pulpen3.500109LULUS TARGET
5Penghapus1.250910TIDAK LULUS

Di kolom Status, kita ingin menampilkan:

  • “LULUS TARGET” jika jumlah terjual ≥ target

  • “TIDAK LULUS” jika jumlah terjual < target

Dengan Excel, kita bisa menggunakan rumus:

=IF(D2>=E2,"LULUS TARGET","TIDAK LULUS")

Rumus ini membaca data di kolom D (Terjual) dan E (Target), lalu secara otomatis menampilkan status sesuai kondisinya.


💡 Mengapa Ini Penting untuk Dipelajari?

  1. Belajar Logika dengan Cara Menyenangkan
    Rumus IF membantu siswa belajar berpikir logis: jika kondisi benar → lakukan A, jika salah → lakukan B.

  2. Keterampilan Dunia Kerja
    Di dunia pemasaran, keuangan, dan manajemen, logika seperti ini dipakai setiap hari untuk menganalisis target, laporan keuangan, dan performa penjualan.

  3. Membentuk Mindset Analitis
    Siswa dilatih untuk membuat keputusan berdasarkan data, bukan perasaan. Ini sangat penting di era digital.


🎯 Kesimpulan

Mengajarkan rumus IF pada siswa bukan hanya soal hafalan rumus, tetapi juga melatih cara berpikir logis dan analitis. Mereka belajar membuat keputusan berbasis data — keterampilan yang akan bermanfaat baik di dunia akademik maupun dunia kerja.

Jadi, jangan ragu untuk menghadirkan contoh nyata seperti ini di kelas. Data sederhana bisa menjadi bahan belajar yang menarik, inspiratif, dan relevan dengan kehidupan sehari-hari.


Salam : Redaksi

Share:

🌟 Semua Hal di Flutter Adalah Widget – Kenalan Yuk dengan Komponen UI Flutter!

🌟 Semua Hal di Flutter Adalah Widget – Kenalan Yuk dengan Komponen UI Flutter!


Kalau kamu baru belajar Flutter, mungkin pernah dengar kalimat “everything is a widget”. Yup! Di Flutter, semua hal dianggap widget — mulai dari teks, tombol, gambar, sampai struktur layar aplikasi.

Bayangin Flutter kayak dunia Lego. Setiap potongan Lego adalah widget, dan tugas kamu sebagai developer adalah menyusun widget-widget itu sampai jadi aplikasi yang keren.

Nah, biar gak bingung, yuk kita kenalan sama keluarga besar widget Flutter!


🔤 Widget Teks (Biar Aplikasi Bisa Bicara)

Teks itu basic banget, dan di Flutter ada beberapa pilihan:

  • Text → Menampilkan teks biasa

  • SelectableText → Bisa di-copy

  • RichText → Beda warna & gaya dalam satu baris


📝 Widget Input (Form & Isian)

Biar user bisa ngisi data atau interaksi dengan aplikasi:

  • TextField / TextFormField → Input teks (misal form login)

  • DropdownButton → Pilih opsi dari daftar

  • Checkbox / Radio → Pilihan tunggal atau ganda

  • Switch → ON/OFF kayak tombol lampu

  • Slider → Geser untuk pilih nilai (misal volume)


🖱️ Widget Tombol (Interaksi Klik-Klik)

Tombol adalah jembatan antara user dan aksi aplikasi:

  • ElevatedButton → Tombol timbul (material design)

  • TextButton → Tombol minimalis

  • OutlinedButton → Tombol dengan border

  • IconButton → Tombol berupa ikon

  • FloatingActionButton → Tombol bulat mengambang di pojok


🖼️ Widget Gambar & Media

Biar aplikasi kamu nggak garing, perlu ada visual!

  • Image → Gambar dari file atau internet

  • CircleAvatar → Foto profil bulat

  • VideoPlayer (package) → Muter video

  • Lottie (package) → Animasi aesthetic


🧱 Widget Layout (Susun Tata Letak)

Ini bagian yang paling bikin kreatif!

  • Container → Wadah serbaguna (warna, margin, padding)

  • Row / Column → Susun horizontal atau vertikal

  • Stack → Tumpuk widget

  • Expanded / Flexible → Atur ukuran fleksibel

  • Center / Align → Posisi widget pas

  • SizedBox → Bikin jarak kosong


📜 Widget Daftar (List & Grid)

Kalau aplikasi kamu banyak data, pasti butuh daftar:

  • ListView → Daftar scrollable

  • GridView → Tabel kotak-kotak

  • ListTile → Item daftar siap pakai

  • ExpansionTile → Item bisa di-expand


🧭 Widget Navigasi (Pindah Halaman)

Biar user bisa keliling aplikasi:

  • Scaffold → Kerangka layar

  • AppBar → Bar di atas

  • BottomNavigationBar → Menu di bawah

  • Drawer → Menu geser dari samping

  • TabBar → Navigasi berbasis tab

  • Navigator → Pindah halaman (push/pop)


🔔 Widget Feedback (Pesan & Loading)

Komunikasi balik ke user itu penting:

  • SnackBar → Notifikasi singkat

  • AlertDialog → Popup konfirmasi

  • ProgressIndicator → Loading state


🎨 Styling & Tema

Biar aplikasi kamu punya vibe yang konsisten:

  • Theme → Atur tema global

  • MaterialApp / CupertinoApp → Root app (Android/iOS)

  • MediaQuery → Biar desain responsif


🎯 Kesimpulan

Belajar Flutter itu sebenarnya belajar mainan puzzle digital.
Kuncinya: kenali widget, paham fungsinya, lalu susun jadi aplikasi.

Buat pemula, cukup kuasai dulu:
Text, TextField, Container, Row, Column, ListView, ElevatedButton, Image, Scaffold, AppBar, Navigator.

Sisanya bisa kamu pelajari sambil bikin proyek nyata.


Pro Tip:
Bikin mindmap atau cheat sheet widget, tempel di meja belajar. Jadi setiap ngoding, tinggal lirik tanpa harus googling lagi.


Apakah kamu mau saya buatkan versi visual (poster atau mindmap) supaya artikel ini bisa langsung jadi materi ajar & bisa ditempel di kelas? Cocok banget buat motivasi siswa belajar!

Tunggu ya di postingan berikutnya ...

Share:

🔥 Skill Wajib Gen Z: Mengetik Cepat + Jago Office = Modal Jadi Produktif!

🔥 Skill Wajib Gen Z: Mengetik Cepat + Jago Office = Modal Jadi Produktif!

Halo sobat kreatif! ✨

Pernah nggak sih kalian ngerasa lambat banget pas ngetik tugas? 😅 Padahal deadline udah mepet, guru udah nagih, dan teman-teman udah pada submit duluan. Nah, kali ini kita bahas sesuatu yang kelihatannya sepele, tapi game changer banget buat hidup kalian: kemampuan mengetik cepat dan rapi + skill Microsoft Office.

🚀 Kenapa Mengetik Itu Penting?

Mengetik cepat dan tepat bikin kita:
Lebih produktif – Tugas selesai lebih cepat.
Lebih fokus – Nggak perlu mikirin keyboard, ide langsung ngalir.
Lebih percaya diri – Nggak panik pas disuruh bikin laporan dadakan.

Kabar baiknya, sekarang ada cara gampang buat cek kecepatan & ketepatan ngetik kalian. Coba deh 10fastfingers.com – tinggal klik, tes, dan lihat seberapa cepat jari kalian menari di keyboard. 🎹💨

🖥️ Modal Penting: Bisa Office!

Selain mengetik, kalian juga wajib banget bisa:
💡 Microsoft Word → bikin laporan yang rapi dan profesional.
💡 Excel → ngolah data, bikin tabel, grafik, bahkan perhitungan otomatis.
💡 PowerPoint → presentasi kece yang bikin guru & teman kagum.

Bayangin kalau kalian bisa ngetik cepat + kuasai Office → bikin proyek sekolah, laporan PKL, atau presentasi kelompok jadi gampang dan anti drama! 🙌

💪 Tips Biar Skill Ngetik + Office Naik Level

  1. Latihan rutin di 10fastfingers minimal 5 menit sehari.

  2. Gunakan 10 jari (touch typing), jangan cuma dua jari, please 😆.

  3. Bikin proyek mini pakai Word, Excel, atau PowerPoint. Misalnya:

    • Word: bikin surat undangan kelas.

    • Excel: bikin jadwal piket otomatis.

    • PowerPoint: bikin slide materi favoritmu.

  4. Tantang diri sendiri – catat progres kecepatan ngetikmu tiap minggu.

✨ Penutup

Skill ini bukan cuma berguna pas sekolah, tapi juga bakal kepakai di dunia kerja dan kuliah nanti. Jadi, mulai sekarang, jangan cuma jadi penonton – jadilah creator!

Coba sekarang, klik link ini → 10fastfingers.com, ukur kemampuan ngetikmu, lalu tulis di kolom komentar:
Berapa WPM (Word Per Minute) kamu?
Apa targetmu bulan depan?

Let's level up bareng-bareng! 🚀💻


Salam : Redaksi

Share:

How to create mobile app wireframes (in just 8 steps) (In Balsamic)

How to create mobile app wireframes (in just 8 steps)
(In Balsamic)


Learn how to wireframe a mobile app in 8 clear steps. Plan faster, design smarter, and build apps that users love—with no design experience required.

Designing a mobile app demands juggling limited screen space, short user attention spans, and platform-specific navigation standards.

For a lean product team (especially if you’re short on dedicated design resources), wireframing is a powerful way to clarify how your mobile app should look and function before investing in full design or coding resources.

Whether you’re a product manager, startup founder, or developer wearing many hats, mobile wireframes keep you laser-focused on what truly matters:

  • A coherent user flow
  • User-friendly interactions
  • Minimal friction on tiny screens

Let’s get started!

Step 1. Discover your users’ top priorities

A bit of user research ensures you aren’t guessing what matters most to your audience.

When it comes to mobile design, people often use apps on the go or in short bursts, so speed and simplicity generally rank high. Even three quick user interviews can reveal whether you should invest in advanced gesture controls or if people just want an easy, step-by-step flow.

For example:

If you’re building a workout-class booking app, hosting a few quick chats with real users might confirm that they want near-instant search and booking—no more than two or three taps. When it comes to mobile, each extra tap is a potential exit point.
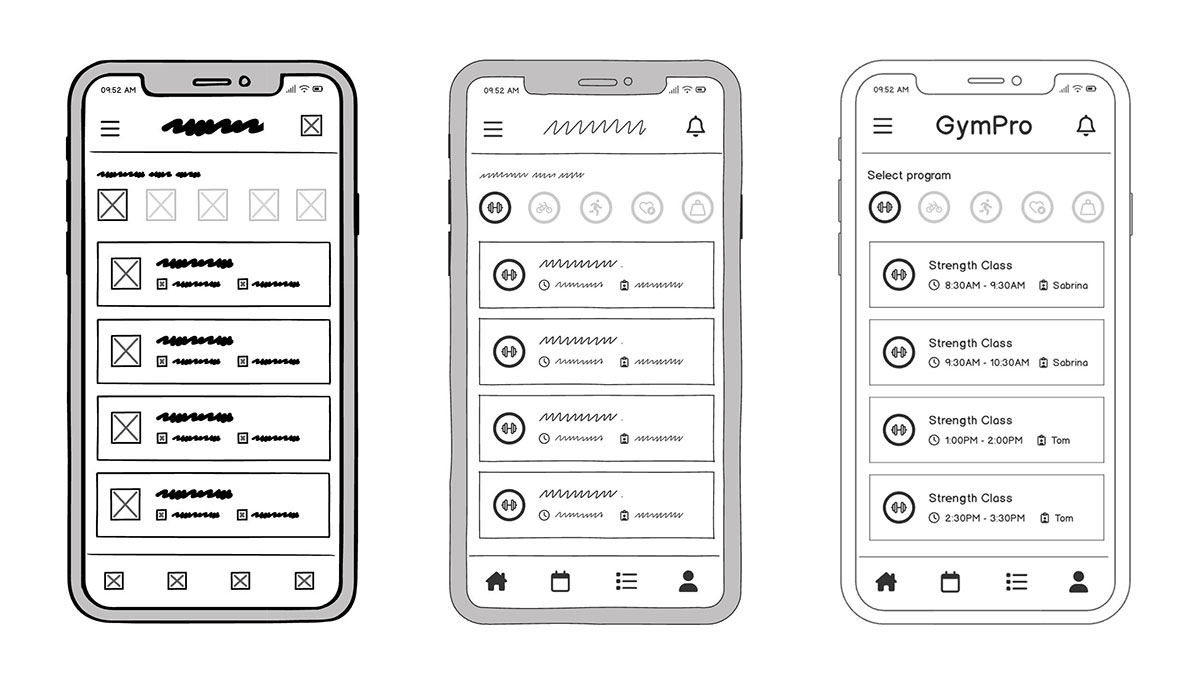
Examples of workout class mobile app wireframe screens

Step 2. Map a lean, mobile-friendly user flow

Why build a user flow first?

Mobile screens don’t allow much room for extraneous features or complicated side journeys. Outlining a step-by-step user flow, sometimes referred to as a wireflow, helps you trim any “nice-to-have” features that might clutter small screens.

Here’s an example flow:

For a class-booking app, the minimal sequence could be:

Home → Filter/Refine → Class Details → Checkout → Confirmation

Designing fewer steps reduces cognitive load on a device where space is limited. If you realize you need a password-protected login, just place that into the flow without losing sight of your MVP (Minimum Viable Product)—the most stripped-down version of your app that still delivers real value to users. It’s your fastest path to launching and learning.
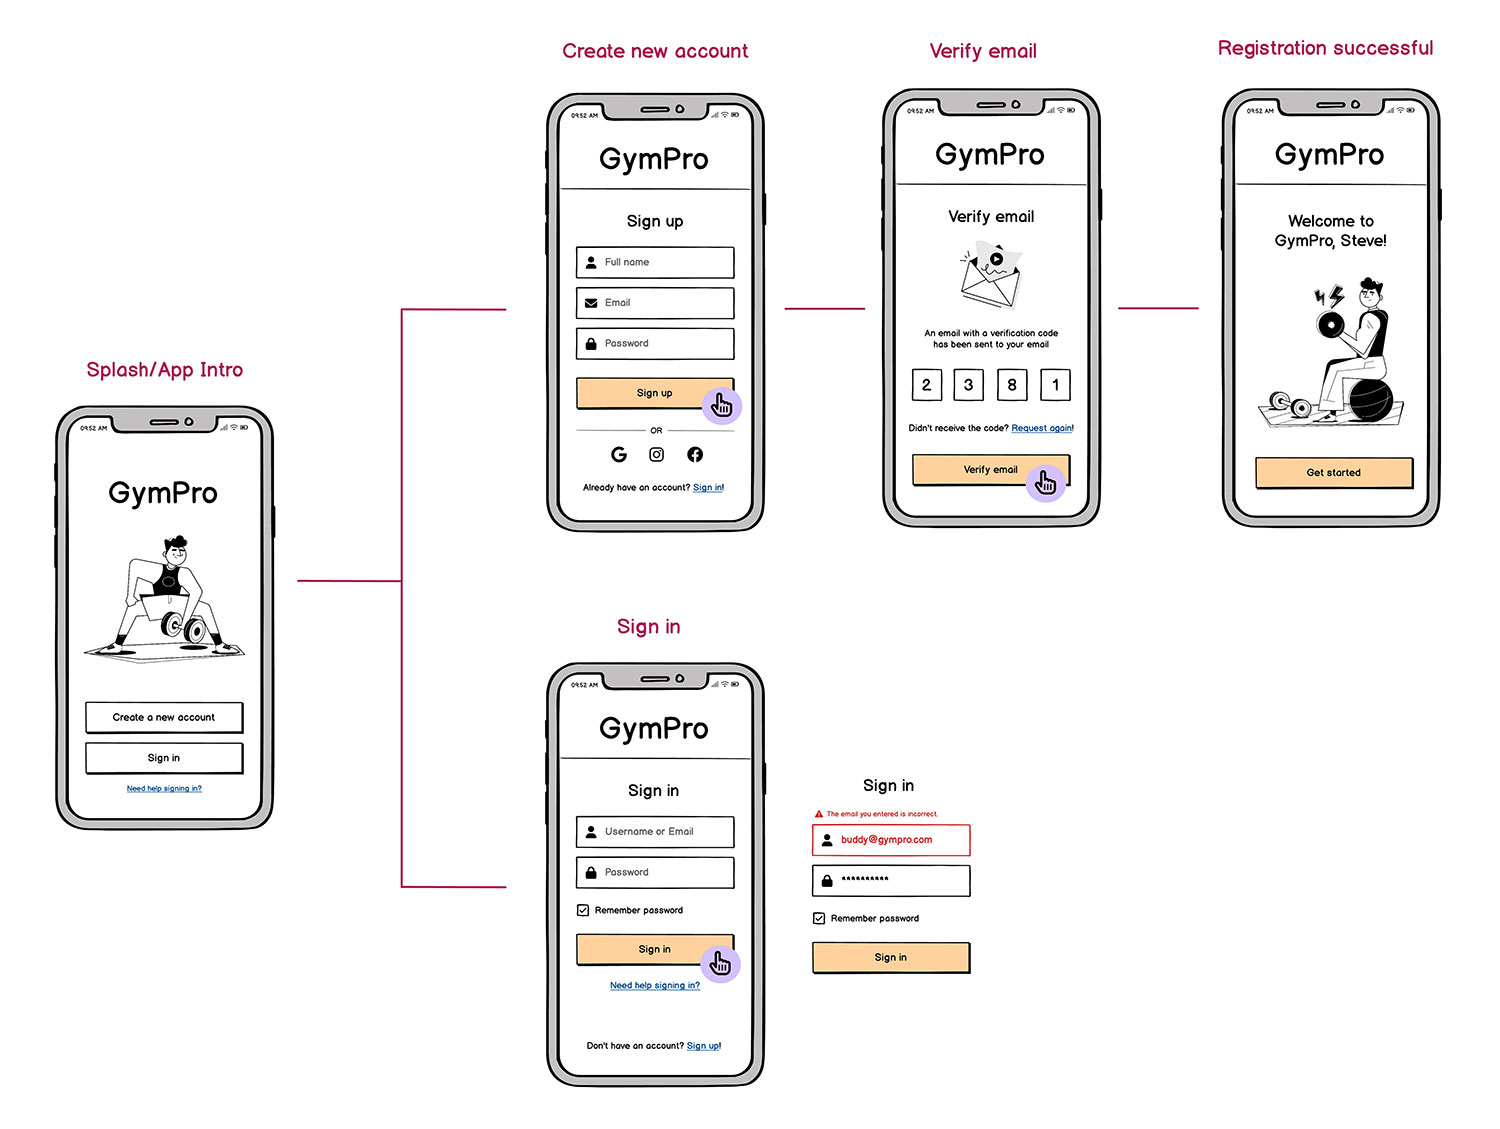
Example of a sign up and log in flow on a mobile app wireframe.

Wireframing a checkout experience using our workout app example.

Step 3. Sketch without worrying about perfection

At this stage, you’re not building the final product. You’re simply figuring out where things go and what’s essential on a small screen. Quick sketches (on paper, a whiteboard, or even the back of a receipt) help you explore layout options, spot potential issues early, and get feedback without wasting time on polish.

Focus on clarity over aesthetics. Ask yourself:

  • Where does the main CTA live?
  • Is it reachable with a thumb?
  • Is the most important info visible without scrolling?

Button placement matters a lot on mobile, especially when screens are small and actions need to be obvious. Don’t get hung up on the details. You’ll refine later. For now, speed is everything.
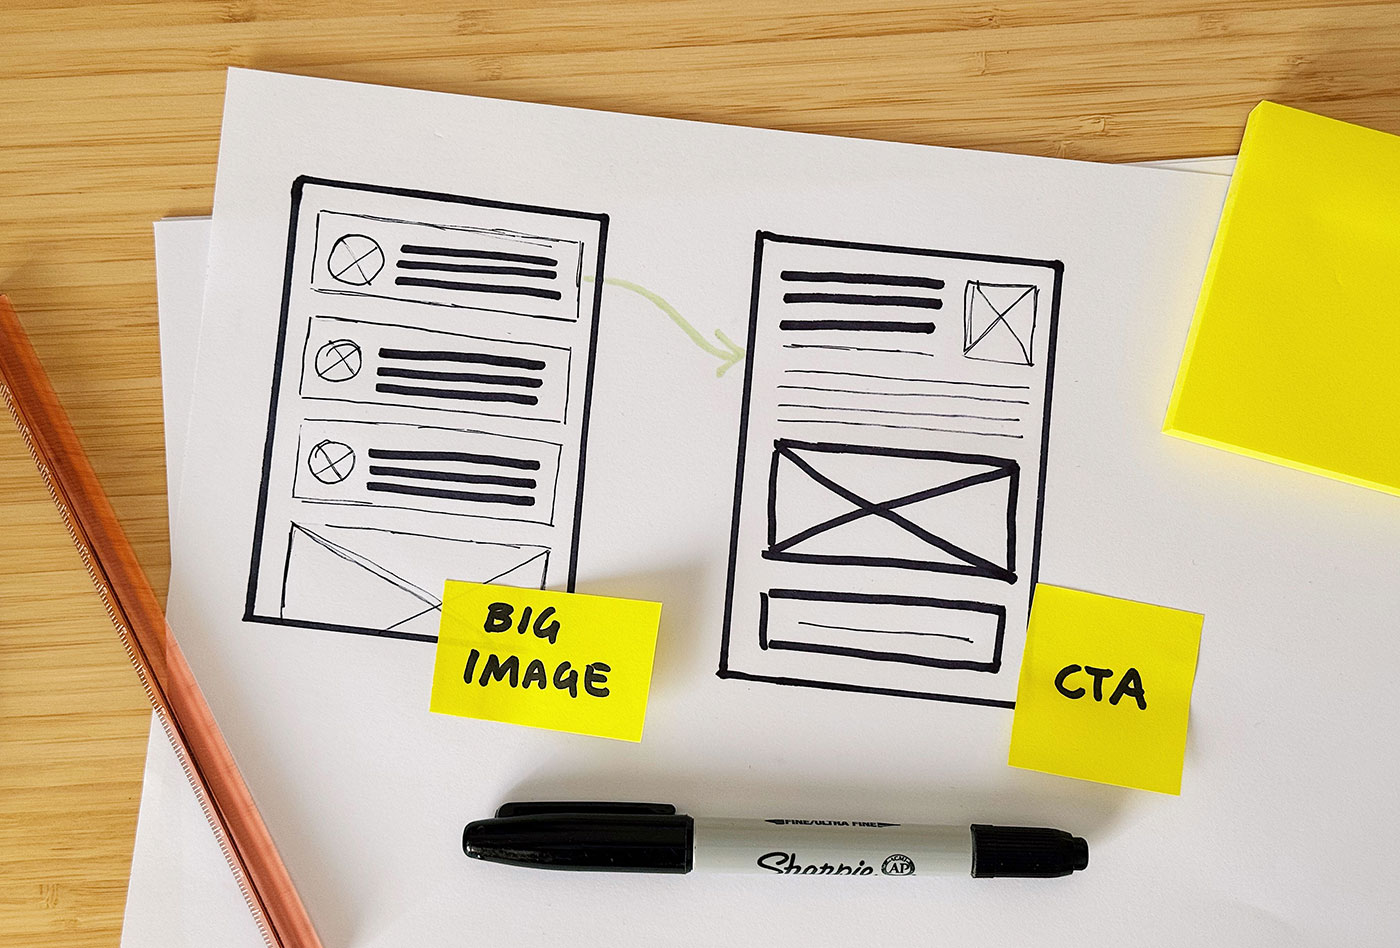
Using a pen and paper to rough sketch your first wireframe.

Why does this matter?

When you start putting the elements in your head onto an actual sketch or wireframe, issues surface fast. You’ll quickly spot if:

  • A promotional banner is taking up valuable screen space.
  • A filter button is placed too high for comfortable one-handed use.
  • The flow from one screen to the next isn’t as intuitive as you imagined.

Mobile design doesn’t leave much room (literally or figuratively) for guesswork. Sketching helps you catch layout and usability problems early, when they’re easy to fix.

Step 4. Move to low-fidelity wireframes that match mobile standards

Once you’re happy with the rough flow, transitioning your concepts into low-fidelity wireframes (using a tool like Balsamiq) gives you a clearer view of spacing, tap zones, and basic navigation elements. Think of this step as your safety net. If you spot layout or interaction issues here, you can fix them in minutes.

  • iOS vs. Android: If you’re leaning toward iOS, consider the standard tab bar or iOS “swipe from left” to go back. For Android, a bottom navigation bar or hamburger menu might feel more natural.
  • Hand Positioning: Many modern phones are quite tall; placing your primary actions (like “Book Now”) near the bottom aids thumb reach, particularly in one-handed use.
Tap areas for mobile wireframes

Creating low-fidelity mobile wireframes with speed

Design your wireframe at a standard phone dimension, like iPhone or Google Pixel, to respect typical mobile boundaries.

You can also tap into Balsamiq’s built-in mobile templates and UI controls, as well as your icons and images when you import them. These elements are already sized and styled to match common mobile guidelines, so you don’t have to memorize every detail.


Just drag and drop the relevant nav bars, buttons, or tab bars from Balsamiq’s library, and your wireframe quickly reflects the platform conventions you need.

Step 5. Start plugging in real copy and data

Placeholder text can hide layout issues until it’s too late. In mobile apps, “too many words” or awkwardly truncated labels can ruin the user experience. Going back to our example from earlier, you can see how real copywriting and data ensures you see how an instructor name, class times, or descriptions fit in the card or list layout.
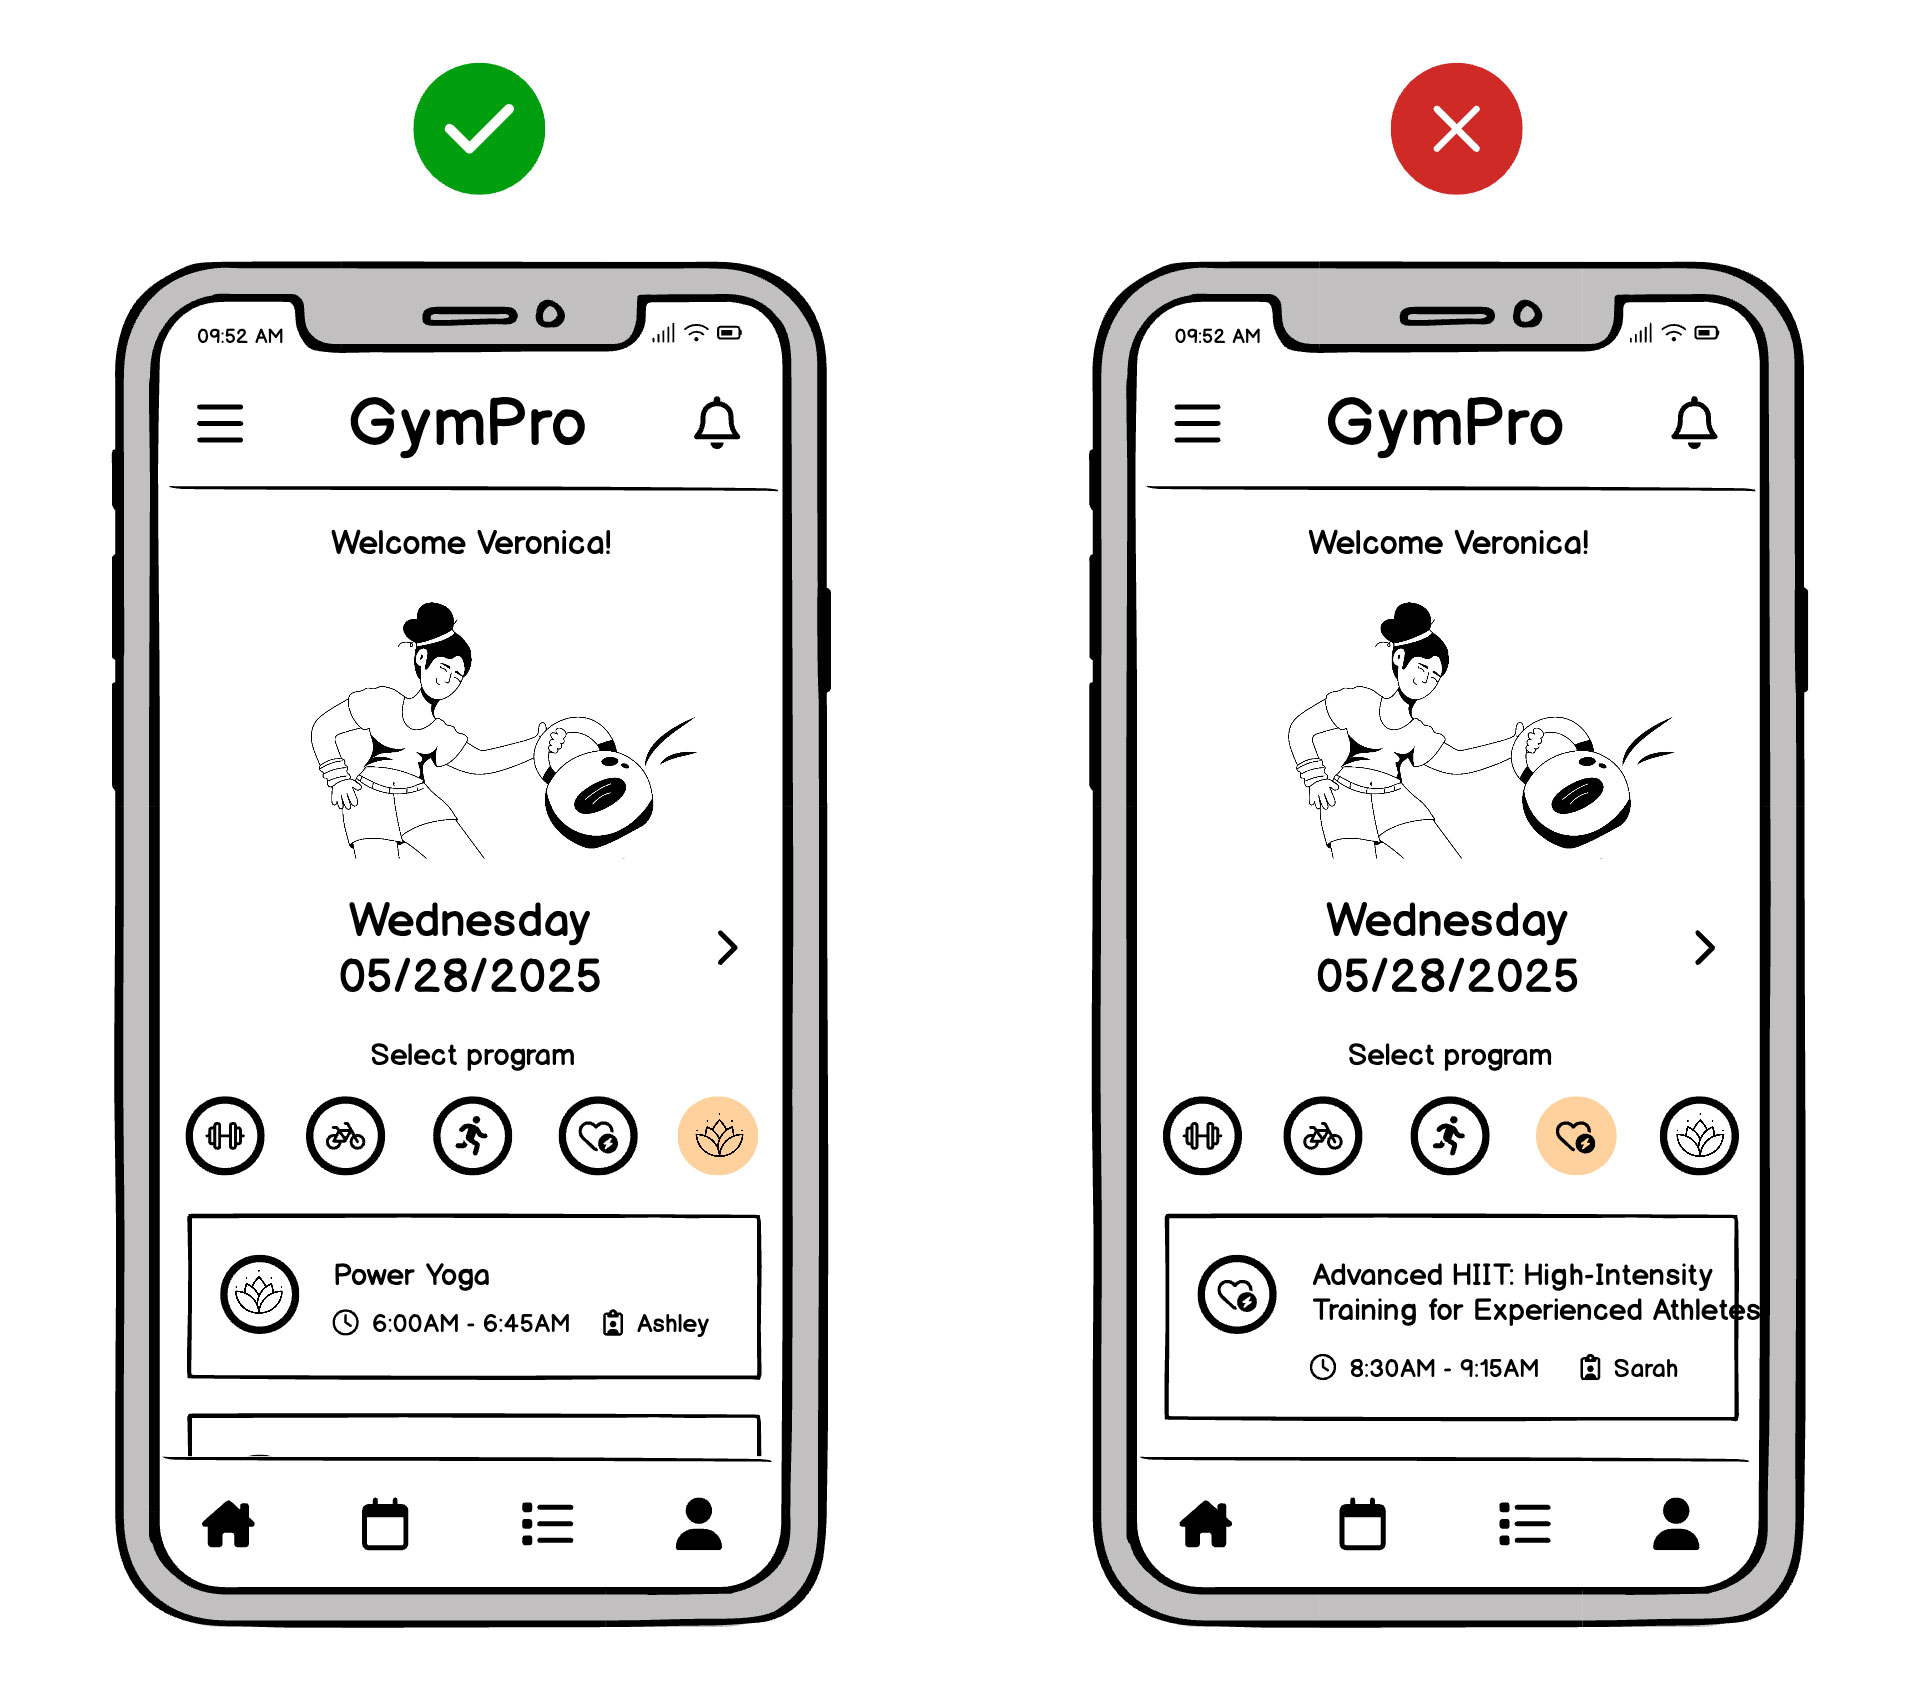
Adding real copy as part of your wireframing process.

For example:

“Power Yoga: 6:00 AM – 6:45 AM” might be fine, but “Advanced HIIT: 45-Min, High-Intensity Training for Experienced Athletes” could break your layout. Spotting that now is cheaper than refactoring your coded screens later.

Step 6. Optimize for various phone sizes and orientations

It’s tempting to design just for a popular mobile device, but not all users update regularly. A quick check on older or smaller screens reveals if your essential buttons or text get clipped.
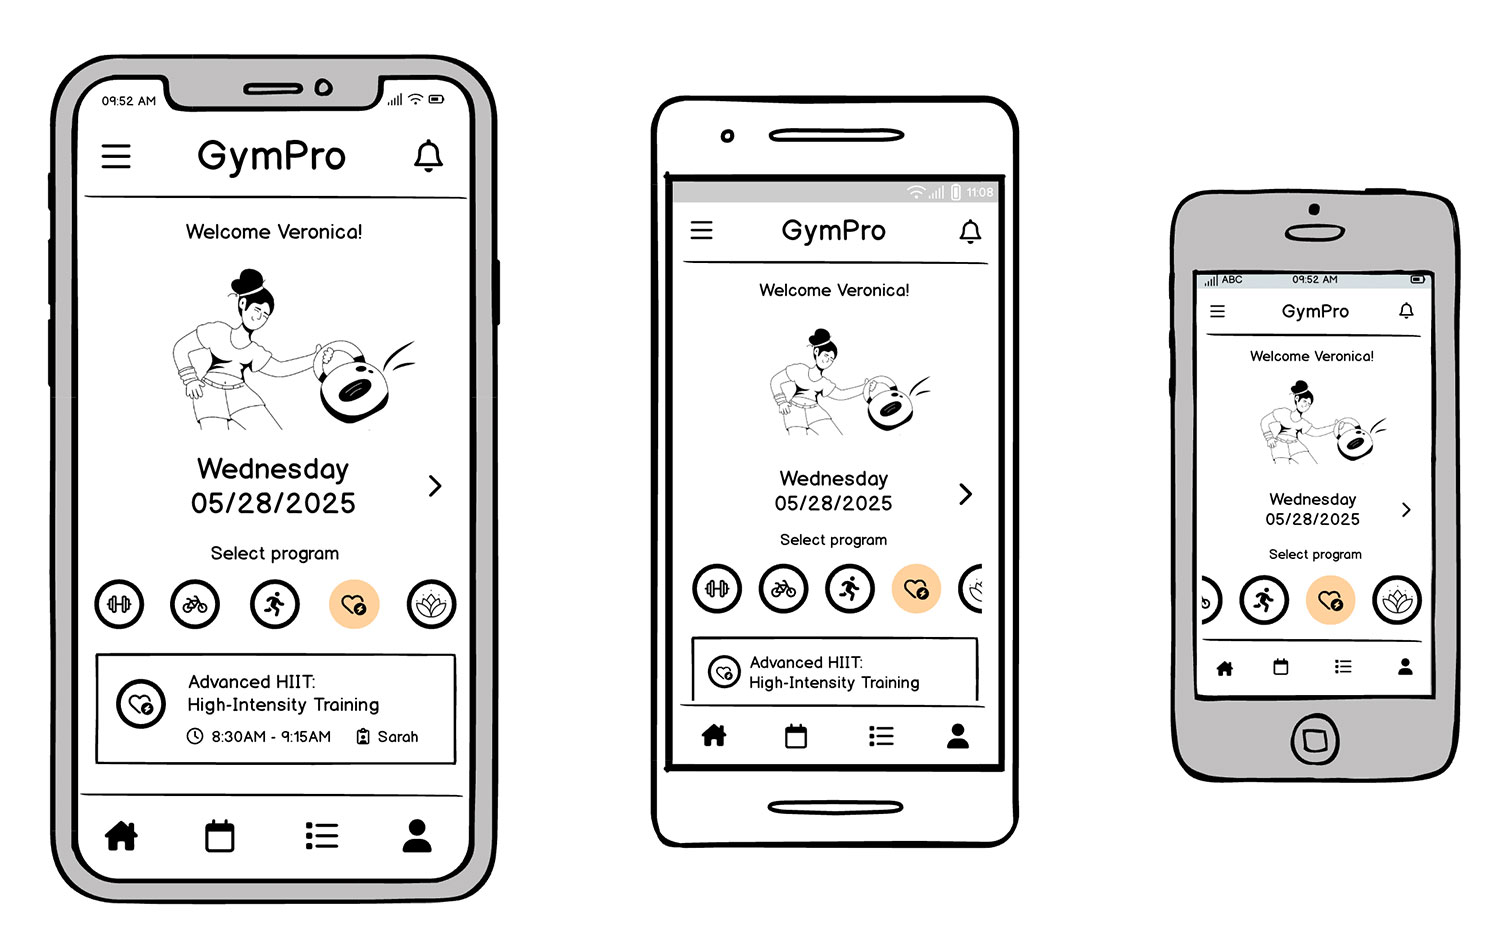
How to optimize your mobile wireframes for different screen sizes.

And if you plan to support both portrait and landscape modes—common for video apps and mobile games—make sure your wireframes adapt gracefully. Sometimes that means re-stacking columns or hiding secondary info behind a collapsible panel.

Why does this matter?

An MVP that looks great on the latest iPhone might be awkward on a smaller Android device. Mobile usage is famously diverse, and you don’t want to alienate part of your audience right away.

Balsamiq helps here too: you can easily duplicate a wireframe and change the dimensions or orientation, then leverage the same UI components. That quick duplication ensures you validate multiple device sizes without re-building everything from scratch.

Balsamiq's extensive library of mobile wireframe templates.

Step 8. Test, iterate, and listen to feedback

Show your clickable mobile wireframes to a small group of users or internal stakeholders. In a lean team, this might happen informally over Zoom or Slack. Rapid iteration matters:

Too many modals?

Mobile users can’t juggle multiple popup overlays—maybe a small dropdown or integrated filter is kinder to your flow.

Unclear terminology?

If the word “Refine” confuses your users, rename it “Filter Options” or “Narrow Results.”

Because you’re still at the wireframing stage, changes remain cheap and easy to do. Even big layout shifts cost only a few minutes of drag-and-drop, not days of re-coding.

Don’t ignore mobile design best practices

Even if you lack formal design training, certain mobile-specific principles keep your wireframes on track:

  • Tap-friendly zones: Buttons around 44px by 44px prevent frustrating mis-taps.
  • Thumb-friendly layout: Place vital actions near the bottom for one-handed ease, especially given today’s tall devices.
  • Simplify text and visuals: Mobile screens are small, so you’ll want to avoid jamming everything onto one screen. Maneuver less critical details into sub-menus or collapsible panels.
  • Use familiar navigation: For iOS, a bottom tab bar or standard “Back” gestures are second nature. Android typically expects a bottom nav or hamburger menu for deeper flows.
  • Orientation awareness: If your audience might rotate their phones (e.g., gamers or video watchers), test quickly to confirm your layout adapts well.

Balsamiq makes best practices simple

Balsamiq’s library includes platform-ready UI controls—like native-looking toggle switches, scroll bars, tab bars, and more—so you can incorporate best practices by simply dragging and dropping. That means you spend less time researching pixel-perfect sizes and more time mapping out the right experience for your users.
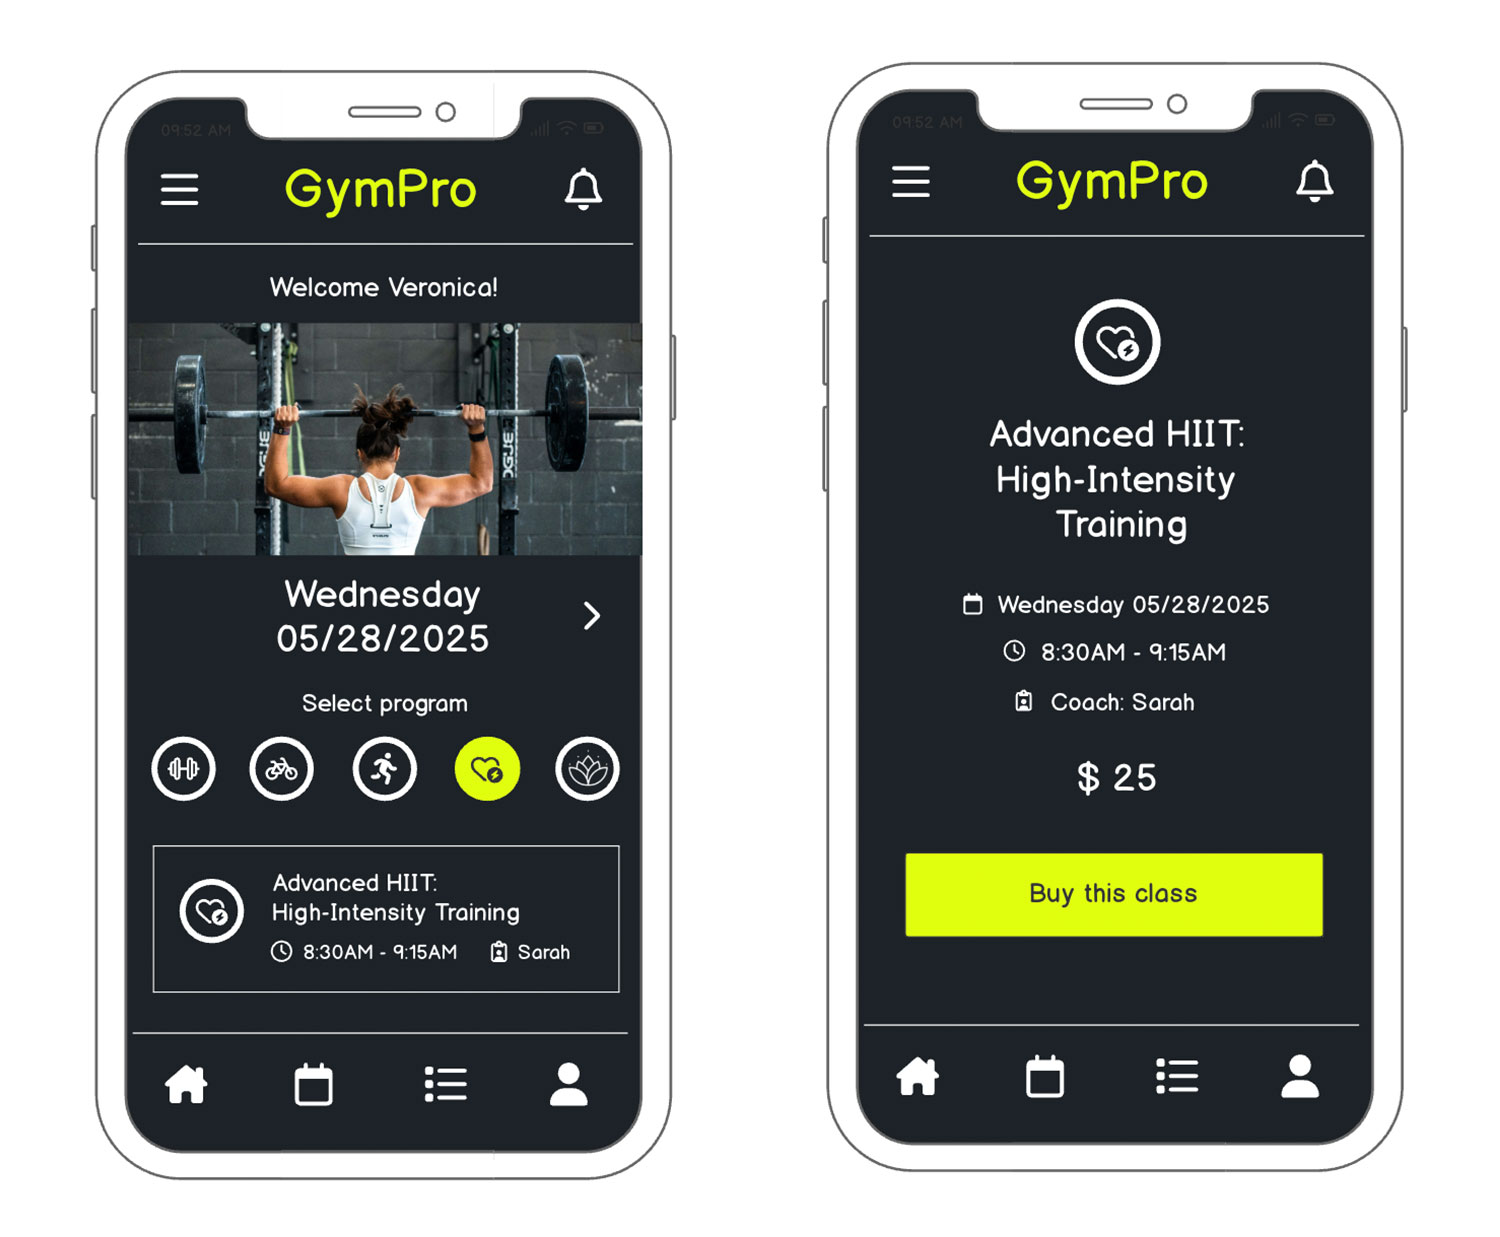
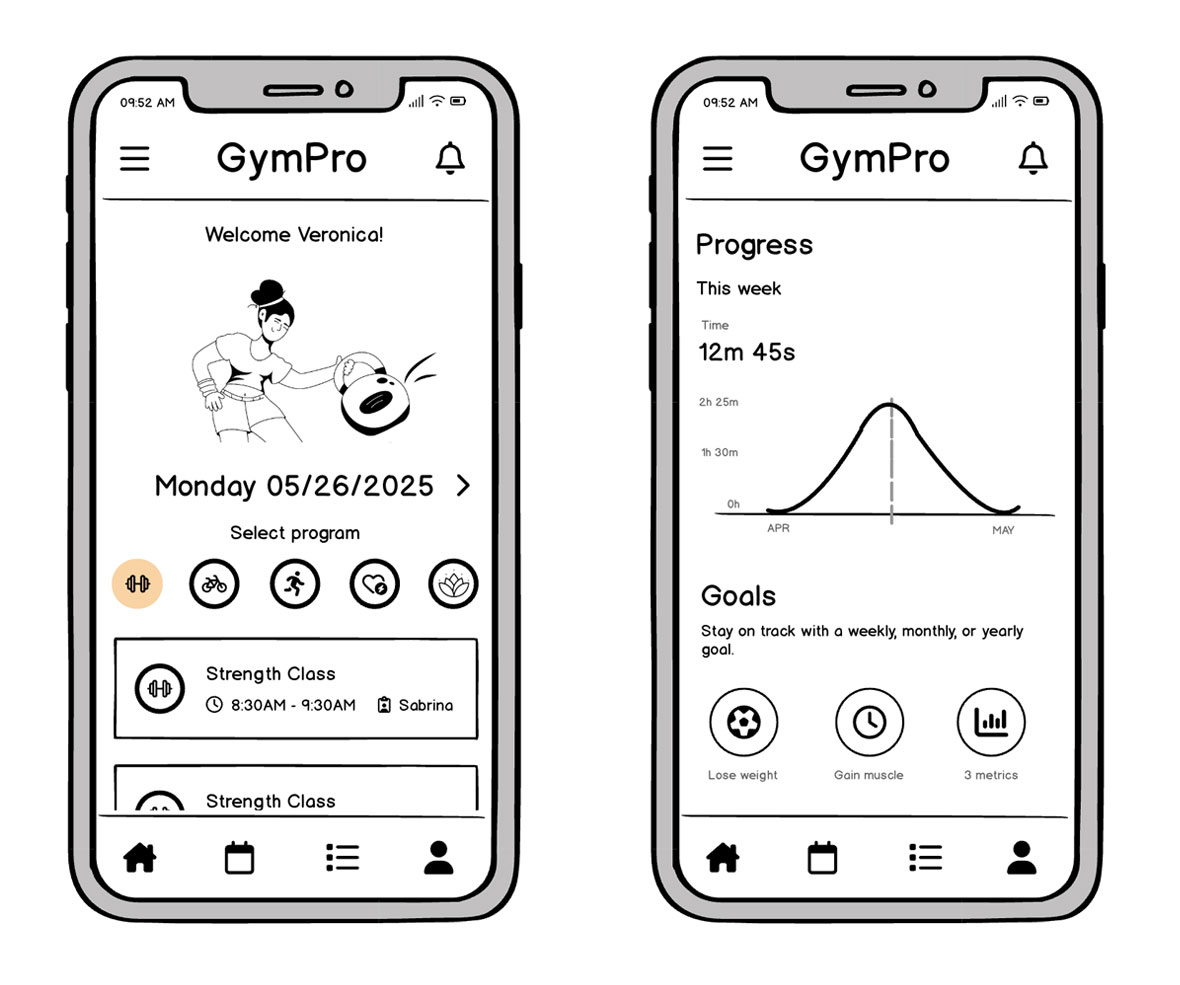
MVP of our workout app example after wireframing, copywriting, and design has been completed.

Create your mobile app faster with wireframes

Wireframing ensures your mobile app respects small screens, user impatience, and best-practice navigation. By focusing on real data, minimal steps, and platform conventions, you skip debates over “the wrong details” and zero in on shipping an MVP that users will actually embrace.

Balsamiq is built for this!

Balsamiq helps you move fast—sketching out ideas in minutes and turning rough thoughts into clear building blocks for your next great mobile app. No design skills needed, no wasted time debating the little stuff.

Ready to see if wireframing is your missing piece?

Try Balsamiq Cloud free for 14 days. Show your team exactly what to build, align on the big idea before code, and watch your revision cycles shrink. That’s how the smartest teams do mobile apps without burning precious resources.


Share:

Chat Admin

Chat via WhatsApp

Arsip Blog

Blogger Tricks

Blogger Themes

Archives